You can be a successful blogger and still need to improve your SEO. To be honest, I routinely share great blog posts to Pinterest that have lousy SEO.
If you’ve been blogging for more than a few months, you might feel daunted by the prospect of updating all your old blog posts for SEO.
This guide will explain which blog posts to update and how to update them. But first… why?
Why You Need to Update Old Blog Posts
You can read every resource in Blog Boss Babe (affiliate link) before launching your blog, and you’ll still make mistakes. Blogging requires trial and error, and after a few months (or years) of blogging, you might cringe at your earliest blog posts. But hey, practice makes perfect!
My earliest blog posts include the following mistakes:
- No vertical photos
- Cheesy graphics
- Original photo sizes
- Photos saved as IMG-123
- Unnecessary photo captions
- No subheadings
- No links to other blog posts.
Ouch.
How to Decide Which Blog Posts to Update First
Updating old blog posts takes time. Your time as a blogger is precious! How do you prioritize which blog posts to update? I use two methods myself. Either one will work.
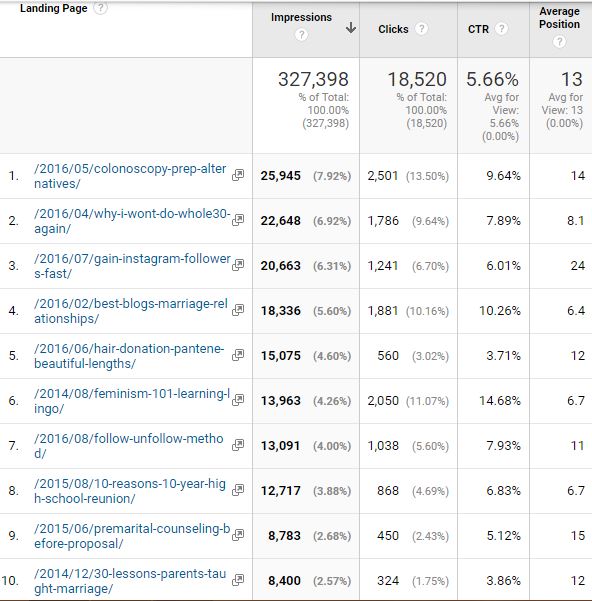
If you already have Google Analytics set up, start with this method. I actually need to hire a Google Analytics expert to fix my tracking tags since I discovered tracking errors during my last diagnostic. Even with those flaws, I can gleam data from Google Analytics to choose old blog posts to update.
Expand the left sidebar until you see a list of Reports: Real-Time, Audience, Acquisition, Behavior, Conversions.
Select Acquisition –> Search Console –> Landing Pages
In the top right corner, specify a date range of at least 30 days. I usually look at 90 days.

This list will show you the blog posts already performing well in search engines. The default sorting is by Impressions (number of times each blog post is seen in search results). It’s also helpful to sort by Clicks (number of times each blog post is clicked from search results).
It might seem counter-intuitive, but you should update your high-performing blog posts first.
If they do well in search, they can always do better in search.
If they do well in search, they can do well on Pinterest.
Related: The #1 Secret to SEO for Lifestyle Bloggers
These are the posts to update first!
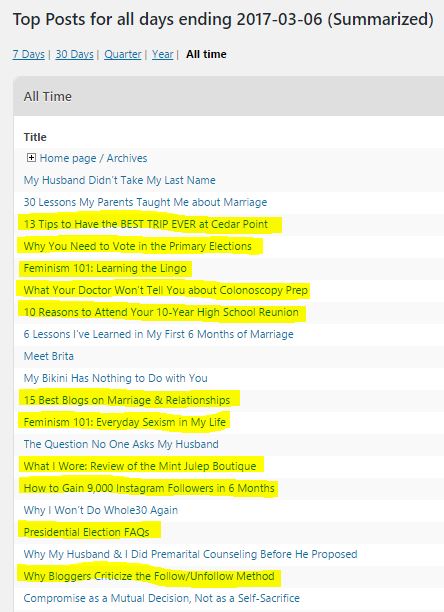
If you haven’t already set up Google Analytics, or if you don’t have much data for it, the second method works as well. Pull up the analytics or stats through your blogging system. For me, this is Jetpack Site Stats.
Look at your all-time most popular blog posts. Choose 10 titles out of the top 20. Focus on older blog posts. Make an educated guess on SEO-friendly blog post topics.

Now that you’ve selected old blog posts to update, what should you update first?
3 Key Things to Update in Your Old Blog Posts
Pictures, pictures, pictures!
Improving the SEO in your blog images is so important. It doesn’t just affect your search rankings on Google, but it also improves your images for Pinterest.
For each old blog post, do the following steps to update your blog images.
- Create a vertical image/graphic for Pinterest that matches your branding.
- Resize all your blog images so the width is the width of your blog post.
- Save your image files with keyword-rich names. For example, the screenshots above are saved as SEO-blog-post-updates and SEO-google-analytics-post-updates.
- When you upload the new images to your blog, fill out the Title and the Alt text. The title should briefly describe the photo. The Alt text should describe both the photo and the blog post.
All of these steps improve both SEO and Pinterest pins!
That Alt text? It shows up on Pinterest as the pin description.

Headings and Subheadings
Adding (sub)headings to blog posts can improve your SEO a little bit, but it can also improve the overall readability of your blog post. Subheadings break up your blog post to make it easier to read (and to skim).
All that text above in different large sizes? Those are subheadings. In WordPress, you can create a subheading by going to the top left while writing or editing a blog post in Visual mode. A drop box labeled “Paragraph” also reveals different headings.
Use keywords and keyword phrases.
Meta Descriptions
Write a unique meta description for each blog post. This shows up in Google search results. A meta description should be a short summary of your blog post. Again, use your keyword and/or keyword phrase.
If you’re on WordPress, it’s easy to add or update the meta description using the Yoast SEO plugin.
If you’re on Blogger, when writing or editing a blog post in the Compose format, the right sidebar has an option called Search Description. This is where you input the meta description.
If your right sidebar does NOT have an option called Search Description, go into your Blogger Settings. Navigate to Search preferences. An option will appear, asking: Enable search description? Click the yes button. Save the changed settings.
Other Blog Updates
Add links to relevant blog posts. I update my old blog posts with links to relevant new blog posts.
Update blog titles… but not blog urls. You can set up a url redirect, but that’s a bit technical. If your old blog post title is boring, or if it lacks keywords, update the title.
Protip: When I promote a giveaway on my blog, I include the word “giveaway” in the blog title, but not in the blog url. After the giveaway ends, I update the blog post to eliminate the giveaway promotion.
I realize this might seem like a lot. However, updating each old blog post should only take 5-20 minutes each, depending on how many images you need to update.
Want to learn more SEO for lifestyle bloggers? I am the new SEO mentor for Blog Boss Babe! Helene Sula just uploaded my webinar on getting started with SEO for your lifestyle blog. I’ve been a member of Blog Boss Babe for over a year, and it’s absolutely been a wise investment.
I’m also offering a special discount just for Blog Boss Babes on my Lifestyle Blog SEO Review.
If you are not already a member of Blog Boss Babe, check it out today!

Great tips! Sometimes I forget to actually add subheadings vs just changing the font!
Karen
http://Www.coupleinthekitchen.com
Sounds like the perfect thing to update in your old blog posts 😉
Great tips – thanks for sharing! I think these are applicable to even newbie bloggers so they start out on the right foot!
Ha, you should actually do a lot more for SEO for a new blog post, but these are the easiest things to fix in an old blog post. These tips should definitely all be followed for new blog posts, though!
Great tips! I really should get better about this!
I hope they help!
Wow these tips are great! I have a lot of work to do! 🙂
Feel free to ask me any SEO questions you might have.
Hey Brita, I’m wondering if you can help me. I can’t find the “Search Description” option on the right side bar in blogger. 🙁 help! haha https://uploads.disquscdn.com/images/2d3a7f84313e8c0fb002f15dac4b5e48d0cb1813c3ed16d4ccf9c0606e1b130e.png
Also, here is the “options” option expanded. https://uploads.disquscdn.com/images/eb5a2736095e348a37ec8973aa54ccfd2254c106cd204da952e60362434c63b7.png
Thanks for reminding me that I need to update this post! I had created my Blogger settings so long ago that I forgot you have to set them up to get the “Search Description.”
Go to Blogger Settings. From there, find Search Preferences. You should have an option that asks Enable search description? Choose yes, and save.
Go back to the blog post draft. It should have a “Search Description” option now.
https://uploads.disquscdn.com/images/51f373e8ac6d292543249a56bc7172eb62b12a85808917437225820ff3afc275.jpg
That worked! Thanks!